
Understanding Studio Equipment, Camera Gear and Photo Editing

In this blog we will go over:
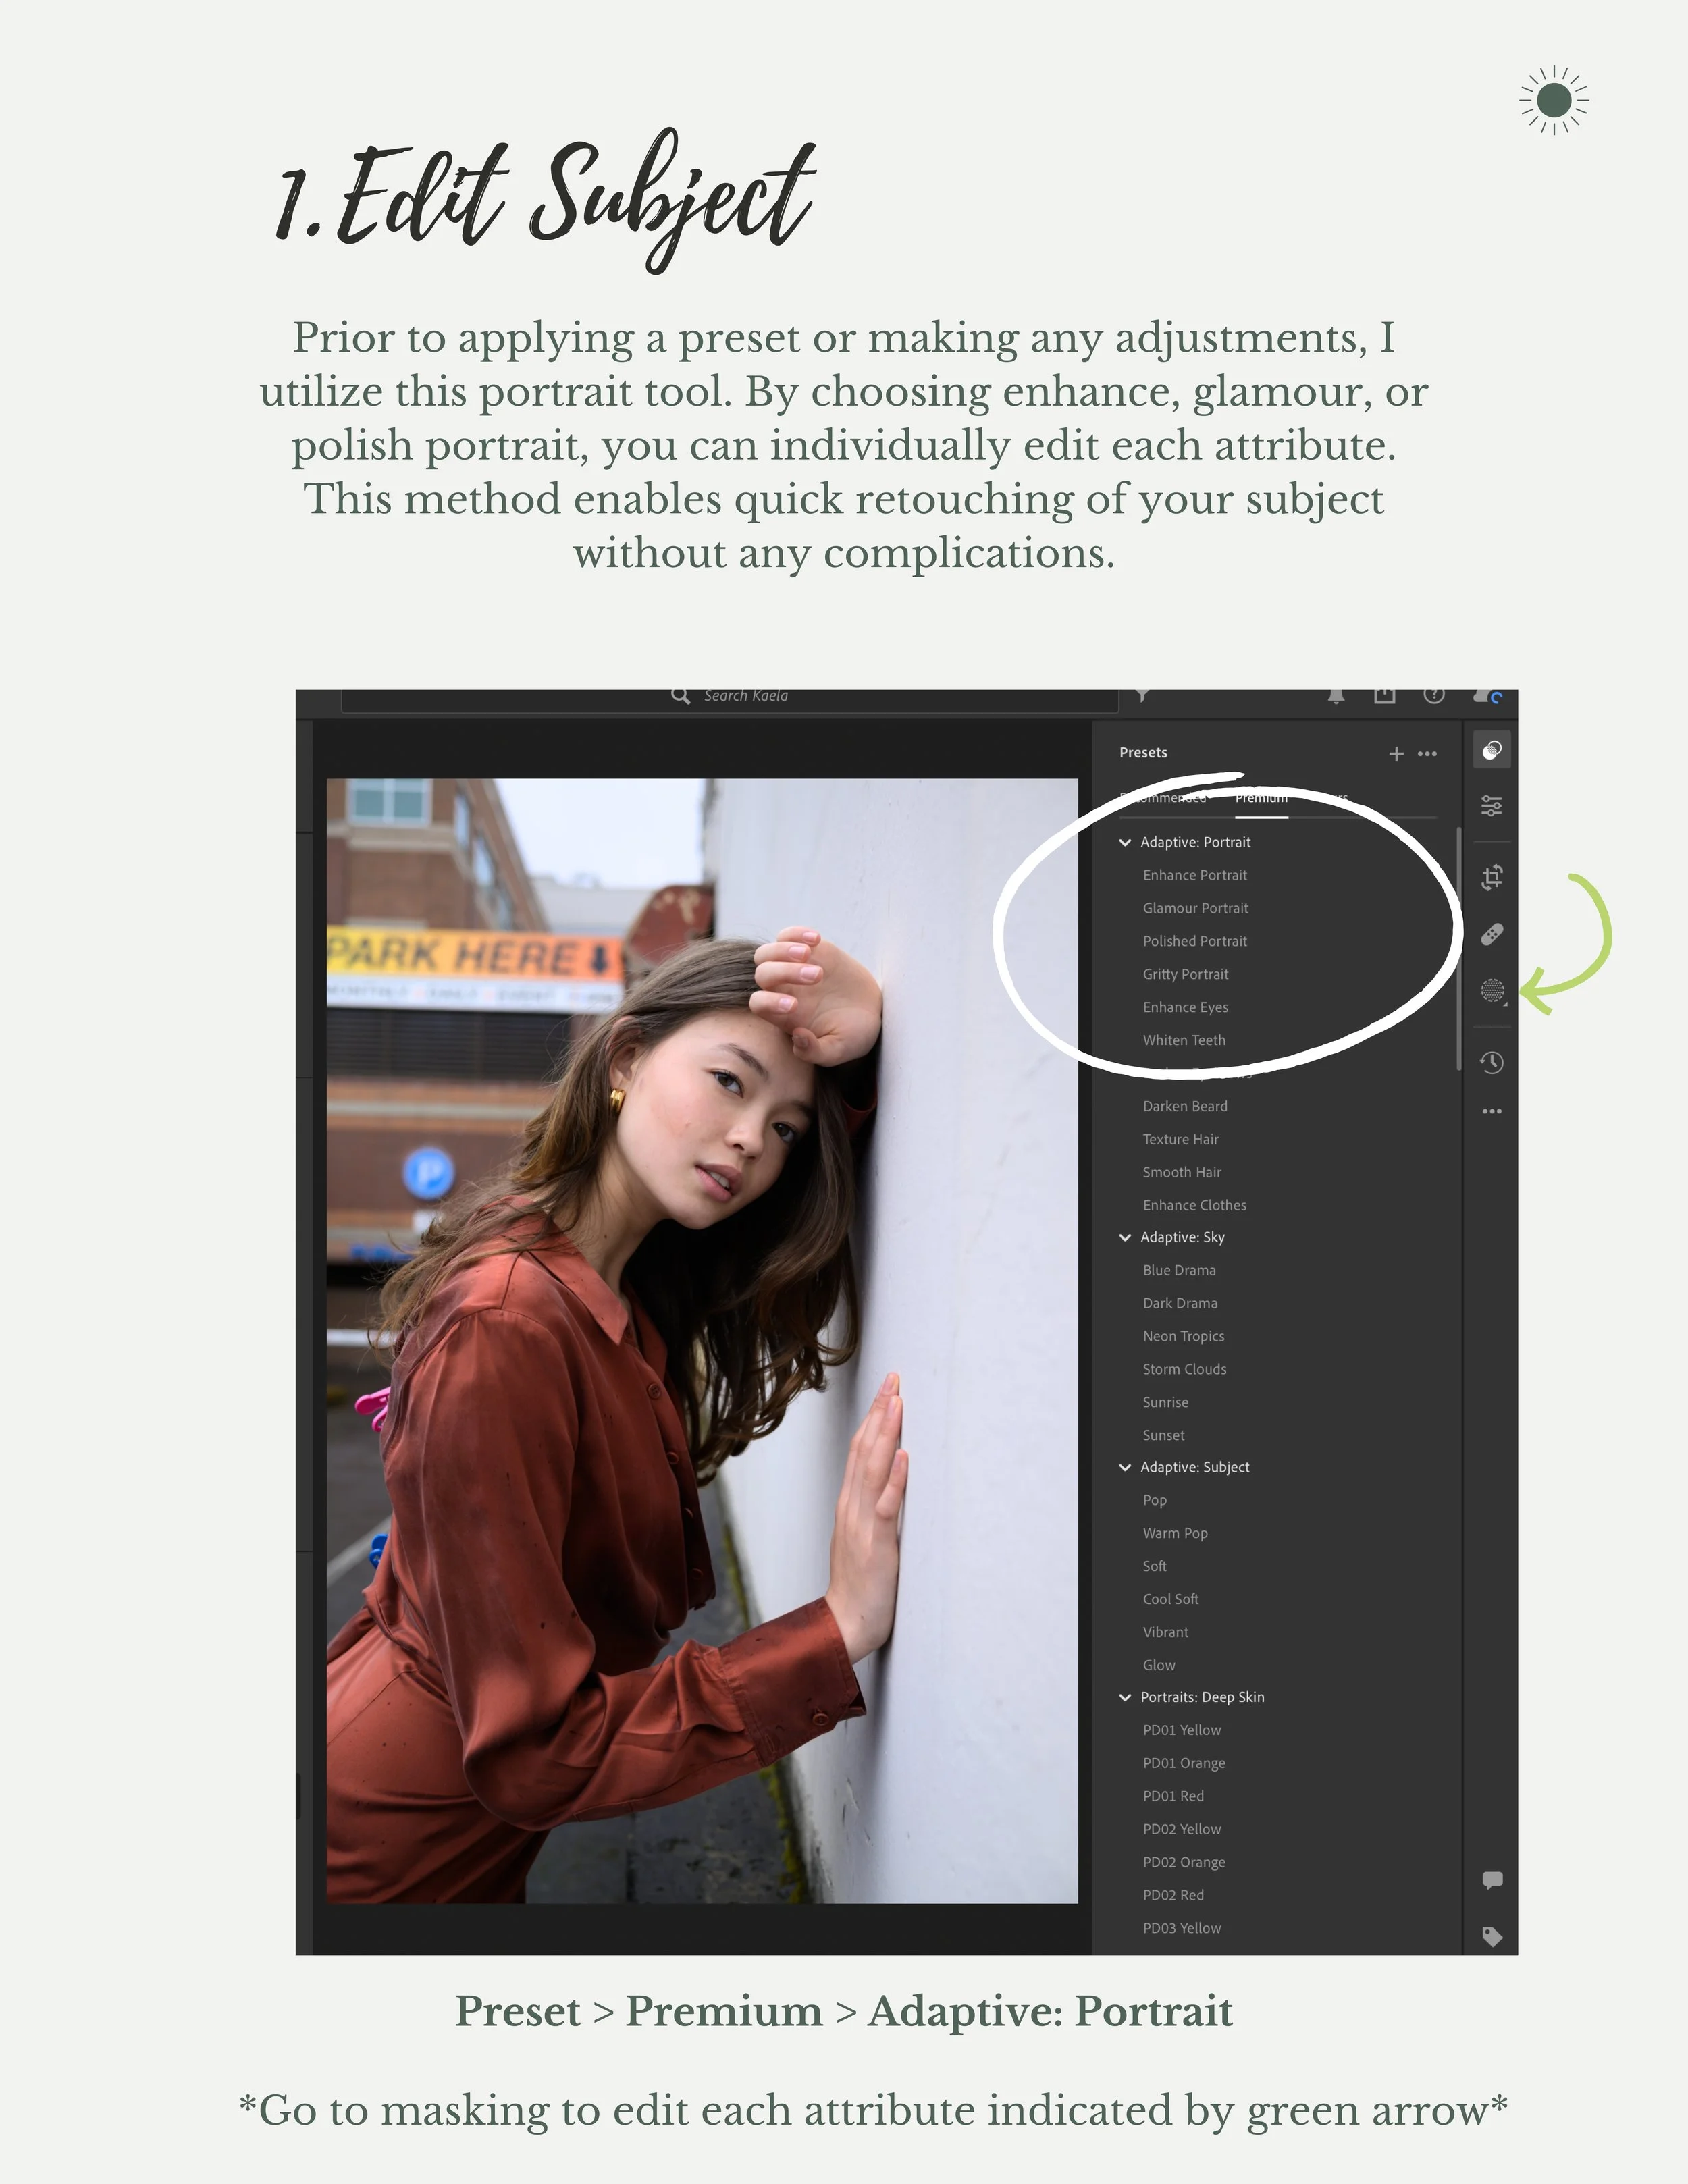
Studio Equipment
Achieving Editorial Editing Techniques
Gear Recommendations
Studio Setup
Softbox lights
A softbox light helps minimize harsh shadows on your subject by filling in areas with contrasting light. Available in various shapes and sizes, softbox lights serve different functions based on their design.
The spread of light remains consistent regardless of size differences. However, larger sizes result in higher quality light and reduce contrast, thereby eliminating harsh shadows.
Smaller softbox lights produce more concentrated light, leading to harsher shadows.
These are excellent investments offered at affordable prices. For beginners starting to work in a studio, I believe this equipment is essential to get you started.
Key, Fill & Backlight
Points to Consider When Working in a Studio:
The key, fill, and back light are essential elements. The key light serves as the primary consistent light source, whether it's from a softbox or natural light. It should be the brightest source. The fill light can be adjusted to control the light and shadow on your subject and is flexible in terms of positioning. The fill light is mainly placed on the opposite side of key light. The back light is directed towards the background to create a distinction between the subject and the background.

What is Editorial?
There is a widespread misconception regarding editorial photography. Although it is often associated with images featured in magazines or used to complement articles, there is also independent editorial work. Editorial photography is not confined to a particular style that must be adhered to for it to be considered “editorial”. The key factor lies in the execution of the shoot.
Editorial shoots are meticulously planned, unlike spontaneous events such as a football games or a party. Every aspect is carefully organized, including the concept, attire, hair, accessories, location, model, lighting, and more. Whether focusing on an individual, a fashion piece, beauty products, or storytelling, these photos are purposefully crafted with detailed planning.
When it comes to carrying out a shoot, your attitude is just as crucial as the planning stage. Demonstrating professionalism and showing respect to all involved not only enhances your reputation but also opens doors to future opportunities.
Post Processing
Edit with Intent! After wrapping up the shoot, the crucial phase begins: editing. You don’t want to slack here after all the planning and time you contributed to the shoot. Diving into Lightroom and Photoshop is where the magic happens, but it can also be the most challenging aspect. The software boasts a plethora of tools, each more intricate than the next, and mastering them may take years of practice. However, don't be daunted by the complexity; view it as an exciting opportunity for growth and creativity. Personally, I find myself continually exploring new Photoshop features that I wasn't previously aware of, each discovery adding a new dimension to my editing skills. So, embrace the learning process, experiment fearlessly, and let your creativity flow in every edit you make. Remember, editing with intent will elevate your work from good to exceptional!


Gear
WHAT EQUIPMENT SHOULD YOU OWN?
My response: Whatever suits your preference.
Truthfully, any gear within your budget is sufficient for capturing fantastic photos. Initially, I believed I needed the latest expensive cameras, but my $1200 camera and $300 lens turned out to be ideal for me. I won't dictate your purchase, but I can suggest the best gear for portrait photography.
I find that a prime lens works best for me. I use a Nikon Z 40mm lens and 28mm lens, both are under $300. I like to use compact lenses for easy transportation and increase stability since I tend to move around a lot during shoots.
Personally I prefer to use Nikon cameras, I like the interface and the look of the photos. Despite the brand I do recommend strongly to use a mirrorless camera. It’s the latest technology and there are some at affordable prices. The digital screen defintely does needs some getting use to but the touch screen allows for quick setting changes.
Thank you for dedicating your time to read blog. I trust that the insights I've provided will prove beneficial to you.
Key Points:
Investing in studio lights can greatly enhance your photography.
Ensure you choose the right one for your specific needs.
Thorough planning is essential for successful editorial shoots; attention to every detail is key!
Editing plays a vital role in photography.
Enhancing your skills with new techniques can elevate your photos.
Invest time in improving your editing capabilities.
Quality gear doesn't have to come with a hefty price tag to capture stunning photos.

Beginners guide to TFP
It all begins with an idea.

In this blog, you will discover everything there is to know about TFP (Time for Prints) shoots. I will share valuable tips and tricks I've gained from my experience with TFP, focusing on fairness and setting a positive example for others.
While it's a controversial subject, it's one that must be discussed, particularly for emerging photographers and models.
By the end of this newsletter, I hope you'll have a clearer understanding of how to manage TFP shoots in a way that benefits everyone involved.
First & Foremost...
What is TFP?
TFP can be defined as “Time for Print” or “Trade for Print”. Meaning the model and photographer will dedicate their time in return for photos. These types of shoots are great for aspiring photographers and models, who want experience in hopes of landing future paying clients. Although there is no exchange of money, the model will be able to use the photos to build their portfolio and the photographer can achieve a desired project.
ITS INEVITABLE...
You cannot escape it, TFP work is a must in your photography or modeling career. Unless you’re really lucky, you will not get paid work right away. You need proof that you are experienced and specialized. I cannot even tell you how much TFP work I have done to build my portfolio. But it took me a year to get paying clients and I still offer TFP work today. Don't sit around waiting for money to roll in. Get out there and prove to people that you are worth the money.
Classifications
What you need to note is that TFP is only reserved for Model Shoots. This term is used strictly for those who are in the Model/ Fashion industry. The public has gotten ahold of this term and have used it incorrectly, causing these shoots to get a bad rep. This term should not be used for family, engagement, wedding, boudoir shoots etc. If you're not making any compensation for those type of shoots, well, you're just working for free.
Common Misconceptions
What is so bad about TFP?
From my past experience with TFP shoots, there's always been a misunderstanding on how the work should be divided. I found myself taking on more roles than just photographing and editing. But also finding outfits, booking HMUA (hair and makeup artist) and covering the cost of the studio. I was putting in so much time trying to develop and execute the intended concept. In return the model would only dedicate one hour of their time for the actual session. Its unfair and the photographer feels taken advantage of. This can negatively influence one’s perception on TFP shoots and continue the mistreatment for future opportunities.
You need to label shoots carefully.
TFP shoots have their place but need to be aligned with your strategic goals. It’s fine to offer or accept free shoots to gain experience but as soon as it starts to feel unbalanced, it’s time to re-evaluate. If a model is coming to you with an idea or they need specific photos for their portfolio, they should pay you. You shouldn’t undervalue yourself and give out free shoots forever. Many people will give high compliment to you, hoping that their kind words will get a free shoot. If they think so highly of you then they should see the value of working with you and treat it as a good investment.
But this also applies vice versa, if you have an idea, you need to pay for it. What really classifies a TFP shoot is that both parties want to work with each other and it is a collaborative effort. Or both the photographer and model are needing photos that their portfolio is lacking. These misconceptions have led to photographers and models not taking any TFP work because of the lack of benefit. Rebranding these shoots as a beneficial way to network and gain valuable experience starts with you.
So how do you benefit...
One word: relationships
We need to take a step back and look at what truly can come out of a positive TFP shoot: a relationship. A huge part of “getting ahead” is who you know and how you treat people. The artist or creative community is so competitive but by developing relationships, you can build a reputable name. What does this have to do with TFP? Well these types of shoots are a great start! You are creating a partnership with the understanding that you're there to help each other. There have been numerous times that a model has recommended me to other models and I return the favor. The reason for that is because we shared a great TFP experience. There are plenty of models that I have no problem offering a TFP session because of their character and willingness to work together. First impressions are everything, typically you have one hour to impress.
How to do TFP on a budget
A lot of people overthink TFP shoots, but they can be really simple. If you're just starting out with TFP don't overdo it. People over look a huge purpose of TFP. Photographers it’s a time to become familiar with your camera. Models, it’s a time to practice your posing. Don’t try to be a hero and come up with a complex concept that has “never” been done before.
Honesty Honesty Honesty!
I can't stress this enough, establish what you’re both comfortable with and be transparent about what you can contribute to the shoot. Someone is giving you their time so handle it seriously, don't make promises you can’t deliver on.
A great way to save money is to ask what the model has in their wardrobe. Chances are they have quite the variety due to past shoots. Look through your own closet, see if there are any statement pieces or accessories that can add flair to the shoot. Pick up some $5 flowers from Trader Joes for an easy prop. From my experience a simple tee and jean outfit is a good base and then you can build onto that outfit with accessories. What can really benefit the shoot is creating an inspiration board or simply saving ideas to a pinterest board. This gives the model a better idea of what you are envisioning as far as the outfit and overall vibe of the shoot.
My biggest mistake was overcontributing and it was not worth the headache. You don’t need to go to great lengths in order for it to be successful. You should focus on the model's natural beauty and an over the top outfit can take away from that. Go simple, focus on posing, develop that relationship and get the experience you need.
What if theres money to spend?
There are cases where both parties are wanting to contribute money to the shoot. Which is great but you need to spend it wisely. Here are my most spent items for TFP shoots:
Studio Space: Studios typically run around $75 per hour and is a great way to become versatile with a different style of photography. In my opinion it gives you more of an editorial, clean look. Also with Seattle raining 9 months out of the year, it is a great way to avoid the elements. I always ask the model if they are willing to split the cost. Which the amount is so insignificant compared to the price they would have paid if I charged one of my packages.
Statement Pieces: In reality, all you really need is a piece of clothing that stands out. This can either be an intricate jacket, bold jewelry, modern sunglasses or even those $5 flowers from Trader Joes. These small investments can be used for many shoots to come and is a cost efficient way to build up your prop equipment. Another helpful tip is that I search for outfits that are the models style so they can wear it outside of the shoot. That way, the model is more willing to purchase the outfit.
Hair & Makeup: You don’t realize how much a HMUA artist can add until you book one. It has literally saved me so much time skin retouching and the look is more complete. There are HMUA who are willing to do TFP shoots but truly I believe it is worth the investment. Also it is another way to build up your network of creatives.
Last but not least...
Have everything in writing!
Things can get messy and people can take advantage of you so set boundaries and protect yourself. It also reinforces all parties’ commitments that they will keep their word. You don’t have to be a business owner to have a contract. Look up templates online and get advice from other photographers. You wont regret it. Keep an eye out for my July newsletter all about contracts!
So get out there and take what you have learned from this newsletter! I hope I shared some valuable information for anyone out there that wants to build their portfolio.
Set a Goal:
Look over your portfolio. Establish what it’s lacking and what you are wanting to add to it. It could be Portraits, Beauty Shots, Styled Shoots, Digitals, etc. Whatever it is, TFP shoots are always a great option to build your portfolio fast. Remember it is inevitable, TFP shoots are a must in your photography or modeling journey.

How to Network and Grow Your Instagram Following
It all begins with an idea.

In this blog, we will cover:
Building a community
How to find models and photographers in your area
Proper steps to achieving professionalism
Importance of Communication
Community: The Cure
Imposter Syndrome: We all experience this at some point in our career. It’s a feeling of not belonging, being incompetent, undeserving etc. Unfortunately this feeling can be hard to cure and happens to anyone.
A great way to combat this feeling is building a community that gives you reassurance, a feeling of belonging and motivation to keep going. It also helps to surround yourself with people who you can relate to or have similar experiences.
It’s difficult to achieve anything on your own, trust me I've been there. I always thought of myself as a self-starter, which is true to a degree. But in order to grow and learn at a faster speed, I needed to surround myself with people that are valuable to me.
It’s okay to be selfish
What you don’t expect when growing your community is that you need to be selfish. Meaning that you can be picky about who you connect with. It is all about who you see value in and if you think you can learn from them.
In my experience I have reduced the amount of people I follow based on what they offer me. It seems harsh but it is my following, I want to follow others who motivate me and who I connect best with. I don’t treat my following as people who are just fans of my work. But people who would want to work with me. People who can offer you experience are more valuable than people who only click the follow button.
How do I grow my Instagram following?
Now I’m not an expert on growing a following but I know how you can do it intentionally. If you're wanting to grow your following you must follow a significant amount of people. The average follow back rate is 10%-30% depending on the account. So per 100 followings you can expect 10 followers back. You don’t need to follow everyone and anyone. To get that increase of numbers there are five things you need to consider:
Follow people that makes sense
Look for people who share common interest
Following vs Follower count matters
Pay attention to who others are following
Have substance to your feed, give them a reason to follow you.
Follow people who makes sense
Depending on the creative you are, the people you follow need to make sense. Take the time to examine someone's instagram and what they're all about. Remember, this is your following so you shouldn’t waste your time on someone who doesn't excite you. Pay attention to how often the person posts, make sure that they stay relevant and you’re not following someone who may have abandoned their account.
Do not follow people who have a large following, unless you truly want to follow their work. You will most likely not get a follow back. These accounts are very active and your follow will be lost in their notifications.
2. Look for common interest
The most effective way that I find people to follow is being specific. My number one common interest I look for is location. I love to find creatives in my area because it increases the likelihood of them following me back and potentially working with me in the future. By simply searching “Seattle Photographer” or “Seattle Model”, you will get a huge list of creatives that will follow you back. Having a common interest is huge.
Write down five keywords that describe you and your craft, then search it on instagram. Here are my top five:
Seattle
Portrait Photographer
Editorial
Seattle Model
Model
These keywords can be used alone or together to narrow down the search.
3. Following vs Followers
Your following will be larger than your followers at the start and that's okay. However, you need to pay attention to that count with other people that you follow. If you find someone and their following is half the size of their followers, then you can tell right away that they only follow 50% of their follower requests. Seeing that ratio will determine their likelihood of following you. This is just something to consider if you are left wondering why people are not following you back.
4. Who is following who?
A technique that I have learned throughout my career is paying attention to who is following who. I have found photographers who have the same photography style as me and looked at who is following them. I thoroughly go through that list and follow people who interest me. Chances are they will follow me back since they are following someone whose work is similar to mine.
5. Give them a reason to follow you
Show off you and your work. Having substance to your feed is key, you want to give them a reason to follow you. I cannot stress this enough, you will need to make at least one post of yourself. A quick portrait with a full description of who you are makes it more enticing. Whenever I post a photo of myself, it is one of my most liked photos. It's a nice personal touch to show who is behind the work. I know it’s silly to say but show that you're a person and not just a robot behind the account. Take advantage of Instagrams feature of pinning post to your profile. These three posts should consist of your most favorite work and a post about you. As shown below I have pinned my proudest work and a photo of myself. Think of these post as a first impression.
Finding models & photographers
After gaining a following, it is time to reach out to people who you want to work with. Those five key words you came up with should be kept in mind but there are ways you can dig deeper.
Hashtags: Be specific by using hashtags. You can follow them and whenever someone uses it then that post will show up on your feed. I follow the hashtags that are specific to my location and interest:
#SeattleModel
#SeattleModels
#SeattleTalent
#SeattlePhotographer
#Heffnermanagement
The last hashtag is a local modeling agency that has their own hashtags for recruitment. This is a great way to find signed and aspiring models.
Photographers: Any photographers that you follow, pay attention to their feed. Who they have worked with? This ties back to who's following who, this time who is working with who? It's just another way to easily find people in your area.
Agencies: Follow your local modeling agencies. Their feed consists of so many models that you can reach out to and do a test shoot with. A test shoot is basically like a TFP shoot but it helps the model out by showing how experienced they are. That way it increases their likelihood of getting paid gigs. Signed models are always looking for test shoot opportunities because their agency requires it. It's a great way to work with models that have experience which can make the shoot go smoothly. They build your network and spreads your name amongst the industry at a higher level.
Professionalism at its best
Time to to Engage: Don’t message them out of the blue. Engage in their content: like and comment on post, check out stories and highlights and check out their portfolio if linked in bio. Most importantly, follow them! You should become a familiar face first and show your appreciation. Then you can reach out to them. But pay attention to how they handle their communication. If they specify by email or direct message, respect that.
What to include in your message
Photographers:
1.Who you are: give background info
2. Ask if they are accepting TFP work or their rate.
3. What your intentions are: type of shoot
4. Send an inspiration board
5. Timeframe: when you want these photos done by.
Models:
1. Who you are: give background
2. Are they accepting TFP or their rate
3. What you are needing for portfolio
4. Send your current portfolio
5.Timeframe
Compliment their work and why you are wanting to work with them!
Communication
It can make or break you
A big reason why I have been successful with booking photoshoots is because of my communication. Not only is it polite but also shows how serious you are about working with the person. I respond to others within 24 hours of receiving a message and I expect that in return. If I don't then I move onto the next. I don't want to waste my time on someone that isn't eager enough to respond back to me in a timely fashion. When we all know were on our phones many times a day.
Big mistake!
Dont Assume.
What I had assumed is that everyone lives by this standard. But that is false! I’ve had people ghost me for weeks and even not responding back till a day before the intended shoot date. They thought the shoot was still happening and ended up getting angry with me when I had already moved on. I’ve had people tell me how I should run my business when they were the ones that demonstrated unprofessionalism. It's almost comical but what I didn't realize is that I needed to communicate my standards to them. Strong communication is what I stand by. I have to be as clear as possible with others and communicate my standards up front. Strong communication is what I stand by. I have to be as clear as possible and communicate my standards up front.

How To Better Your Photoshoot Experience

This month's focus revolves around establishing rapport and enhancing positive relationships through a pleasant photoshoot experience. Remember, there will be tips provided for your personal growth. It's not just about what you can offer the model, but also about self-improvement that can truly make a difference.
In this blog we will be going over the following topics:
-Addressing your comfortabilities
-How to up your photoshoot experience
-Connect & Gain Trust with your Model
A little back story…
Let's dive a little deeper into my personal journey. From a young age, I have always identified as an introvert, finding it challenging to engage in group settings, socialize with new people, and adapt to unfamiliar environments. I am one of those individuals who craves every detail before any significant event. Prior to visiting a new location, I require precise information about its whereabouts, travel time, and appearance – surprises are not my cup of tea. Additionally, I have grappled with mental health issues, having been diagnosed with Social Anxiety and Bipolar II Disorder. With these obstacles, embarking on a career in photography seemed unimaginable to me. Surprisingly, I now find myself interacting with new people regularly, building connections and communities with strangers. Over the years, I have developed coping mechanisms to navigate these challenges, enabling me to feel at ease when meeting new individuals in unfamiliar settings. I leverage these techniques not only for my own comfort but also to ensure others feel at ease. Let's dive into it!
Lets talk about you!
You’re just as important as the subject you are working with, so remember to prioritize your own needs. Feeling comfortable is crucial for me because when I am at ease, I can concentrate better on my subject. Developing certain techniques can be a gradual process, so don't worry if you don't have them all immediately. Everyone is unique, and comfort levels will differ. It took me around a year to establish my plan for photoshoots, and I am still discovering new ways to improve the process. Below is a comprehensive list of comfort strategies that I utilize, which you might find helpful to try out:
Background
Get background on your subject: You will want to know as much as you can about the person you are meeting up with. There is some worry when it comes to meeting a new person but getting to know each other before the shoot takes away some of it.
Clothes
Chances are you'll be quite mobile during a shoot. Personally, I find myself on the ground more often than standing. Therefore, wearing clothes that allow for a wide range of motion is essential. However, this doesn't mean resorting to sweatpants and a t-shirt. You can still make a stylish statement by opting for slacks, fashionable shoes, and a striking jacket. I typically begin with a simple outfit and then layer on items that are suitable for a business casual look. This approach enables me to make a good impression while also being able to shed layers during the shoot for added comfort.
Location
Getting acquainted with your environment helps establish a smooth routine for a successful photoshoot. I have a favorite outdoor location where I know all the perfect spots to capture shots without any interruptions. I plan out my session from start to finish within the hour. Additionally, I have a studio where I feel most at ease and have built a rapport with the owners. This emphasizes the importance of building a community. Studio owners are often creative individuals and fostering a relationship with them can be advantageous.
Music
Playlists establish the atmosphere for the shoot. I prefer playing trendy, upbeat music to energize both my subject and me. Silence in a studio can create awkward moments and alleviate the need to maintain constant conversation. However, this practice is specific to studio settings. Avoid playing music in outdoor locations unless it's just you and your subject present. It's important not to disrupt others who are trying to enjoy their day.
Now For the Model
Having good communication skills is great to have when working with a model. Right before every shoot I go over these points:
What is your comfortability with posing?
The required level of experience and guidance for the model can vary. Some experienced models have established routines and techniques that work effectively for them, while others may require more direction. Both situations are valid, but it's beneficial to recognize this in order to determine your level of input.
The Game Plan
Always make sure to discuss your shoot plan with the model. This is essential for them to understand your vision clearly. Save some aesthetic ideas from Pinterest that inspire you and also collect poses you'd like to try during the shoot.
Is there a side that they prefer?
Many people have a preferred side of their face. In my case, it's my left side; whenever I emphasize my right side, I feel like I look completely different. If there's no preference, that's wonderful! But if there is, consider adjusting the lighting to highlight their preferred side.
Command Words
I like to use specific commands during photoshoots. For example, when I say "Hold," it means I require the model to hold the pose for an extended period to capture different angles effectively. Make sure to go over these before shooting.
Affimations
You should provide feedback to your model throughout the photoshoot. Utilize simple one-word affirmations such as "Perfect," "Awesome," "Yes," "Amazing", etc. While it may feel a bit silly initially, you'll soon realize its importance. Maintaining a high level of enthusiasm with your model is crucial for achieving optimal results.
Theres always more…
When you need a model to strike a particular pose, demonstrate it yourself. You don't have to be a pose expert, but it's crucial to grasp the pose before guiding others. I've rehearsed poses in front of a mirror to effectively instruct my models. Taking just 5 minutes a day to practice this can make a difference.
A model can find it helpful to have access to a mirror during the photoshoot. Typically, studios have mirrors available, and I will place one behind me so the model can view themselves. This allows the model to assess their posture and outfit for any necessary adjustments.
I have a unique approach called the "sit down, stand up game" that I use when working with models. I prefer to match their level depending on the pose we are working on. For example, if I ask my model to sit on the floor, even if it's cold and slightly untidy, I join them. This adds a personal touch and demonstrates that we are collaborating together.
The final touches
Establishing rapport extends beyond a positive photoshoot experience. Given the personal nature of a photoshoot where models showcase their entire selves, building trust is essential. It's crucial for the model to feel confident that you are capturing their essence as they envision it. Taking breaks during the shoot to connect with your model is vital. I typically share a few photos with the model to assess our progress as a team. While not necessary to show every single photo, review the shots taken thus far and present the best ones. Discuss what is working well and areas that could be enhanced.
I might be repeating myself, but excellent communication skills are crucial. Make sure to be responsive before and after the shoot. Show your enthusiasm for collaborating with them and express gratitude afterward. Keep them informed about your editing progress and deliver the photos promptly. If you anticipate delays due to a busy schedule, provide a sneak peek of 5-10 photos. It can be unsettling for models not to hear from you for an extended period after a shoot.
Make a Plan: Make a list of locations that you are comfortable at and some that you want to visit. If there are any, take some time out of your weekend to do a quick drive by to scope it out. Create a pinterest board of poses you would like to achieve at your next shoot and practice them in the mirror. Create a go to playlist for your future shoots. With what I taught you, come up with new ways to improve your photoshoots

How To Prepare For A Styled Fashion Photoshoot

We will explore the concept of inspiration boards, covering their content, significance, and initial steps. When collaborating with clients, models, or brands, it is essential to convey ideas clearly and precisely.
Furthermore, you will have access to all the successful concepts I have developed and the inspiration boards that guided them. Also some I still desire to achieve.
Lets get into it!
How do you get started?
Canva.com is the most user-friendly platform for designing boards. It offers a free plan with access to all tools, while a subscription of $14.99 per month grants access to all designs. I frequently utilize this tool to craft boards, pricing guides, logos, and more, finding it extremely beneficial in developing my brand.
When coming across a concept I ask myself three main questions: is it achievable?, do I have the resources? and is the photo photoshopped? The last question is so important because I have tried to execute concepts before and miserably failed because the photo was heavily photoshopped. If you have the skills to photoshop an image then go for it but if not then it will be very difficult to achieve abstract and eleborate concepts.
For intricate concepts requiring numerous props, a photo assistant might be essential. Having someone to assist in setting up the shoot can be very beneficial in saving time, especially when utilizing a rented studio. Consider granting the assistant 15 minutes of the shoot for their personal use, allowing them to capture any photos they desire as compensation if you are working within a tight budget.
Just a Friendly Reminder
Starting with an inspiration board is just the beginning; be prepared for the idea to transform into something entirely new. Effective coordination among all parties involved is crucial. It's essential to ask the model if they have similar items in their wardrobe as what's on the board. Always ensure your model sends you photos of possible outfits and be prepared to offer suggestions, as not everyone has a wide variety of clothing options.
The pressure that I felt when starting out portrait photography is that I need an original idea for my work to stand out. But I started to realize that this is not a healthy way of thinking. Not every idea is original, so many concepts have been executed by many other creatives. But think of a concept and how you can add your own flair to it. Some resources that have provided me concepts have been Pinterest, Kavyar.com, and following well established photographers.
7 Key Points
1.Clarifies Vision:
Inspiration boards clarify the vision and concept for the shoot. They allow the team to have a clear understanding of the look and feel that is being aimed for.
2. Sets Tone and Mood:
By curating images that evoke specific emotions or atmospheres, inspiration boards establish the tone and mood of the shoot. Whether its a romantic, whimsical, edgy or vintage vibe, the board proves a visual reference point for everyone involved. Including some desired poses will also communicate the mood, whether the poses are natural, dynamic, structured etc.
3. Ensures Coherence:
Consistency is key in photography projects. Inspiration boards ensure coherence by ensuring that all elements- from wardrobe and props to lighting and composition- align with the over arching concept. Incorporating a color scheme is an excellent method to maintain the desired atmosphere.
4. Facilitates Communication:
It serves as a communication tool, allowing the team to effectively convey ideas and preferences. Instead of relying solely on verbal descriptions, the boards provides a concrete visual reference that can be easily understood by all team members. It is also important to include day of details such as: location, time, duration of shoot, if theres an entry cost, model details, your contact info, etc.
5. Encourages Collaboration:
Collaboration is at the heart of successful photoshoots. Inspiration boards encourage brainstorming and collaboration among team members, sparking creative ideas and fostering a sense of unity in working towards a common goal. Any creative would like to know beforehand what they are signing up for. When reaching out to brands in hopes of using products for the shoot, sending a board is a must. They want to know how their products will be represented.
6. Helps with Planning and Preparation:
When planning a photoshoot, it's crucial to think about every detail to ensure a successful outcome. Taking into account who will be responsible for providing the wardrobe and props is key in setting the tone for the shoot. Additionally, discussing studio fees and budget considerations early on can help manage expectations and avoid any surprises down the line. By addressing these aspects in the initial stages, you can lay a solid foundation for a smooth and productive photoshoot that brings your creative vision to life.
7. Flexibility and Adaptability:
While inspiration boards provide a roadmap, they also allow for flexibility and adaptability during the shoot. They serves as a starting point for creativity to flourish, rather than rigid guidelines that must be strictly adhered to. Looking back at any inspirational photos can kick off the photo shoot. If there's a particular image you aim to capture, prioritize it to avoid overlooking it. During the shoot, ideas might fade amid stress or distractions.
Now, let's dive into the exciting part.
Here are the concepts I've curated for myself, and now I'm thrilled to share them with you. These ideas can help you diversify your portfolio and spark your creativity. I trust you will find them beneficial and great examples of how to put the boards together. You can access all of them for download in PDF format at the beginning of the newsletter. * I have removed model and personal details due to privacy reasons*


